
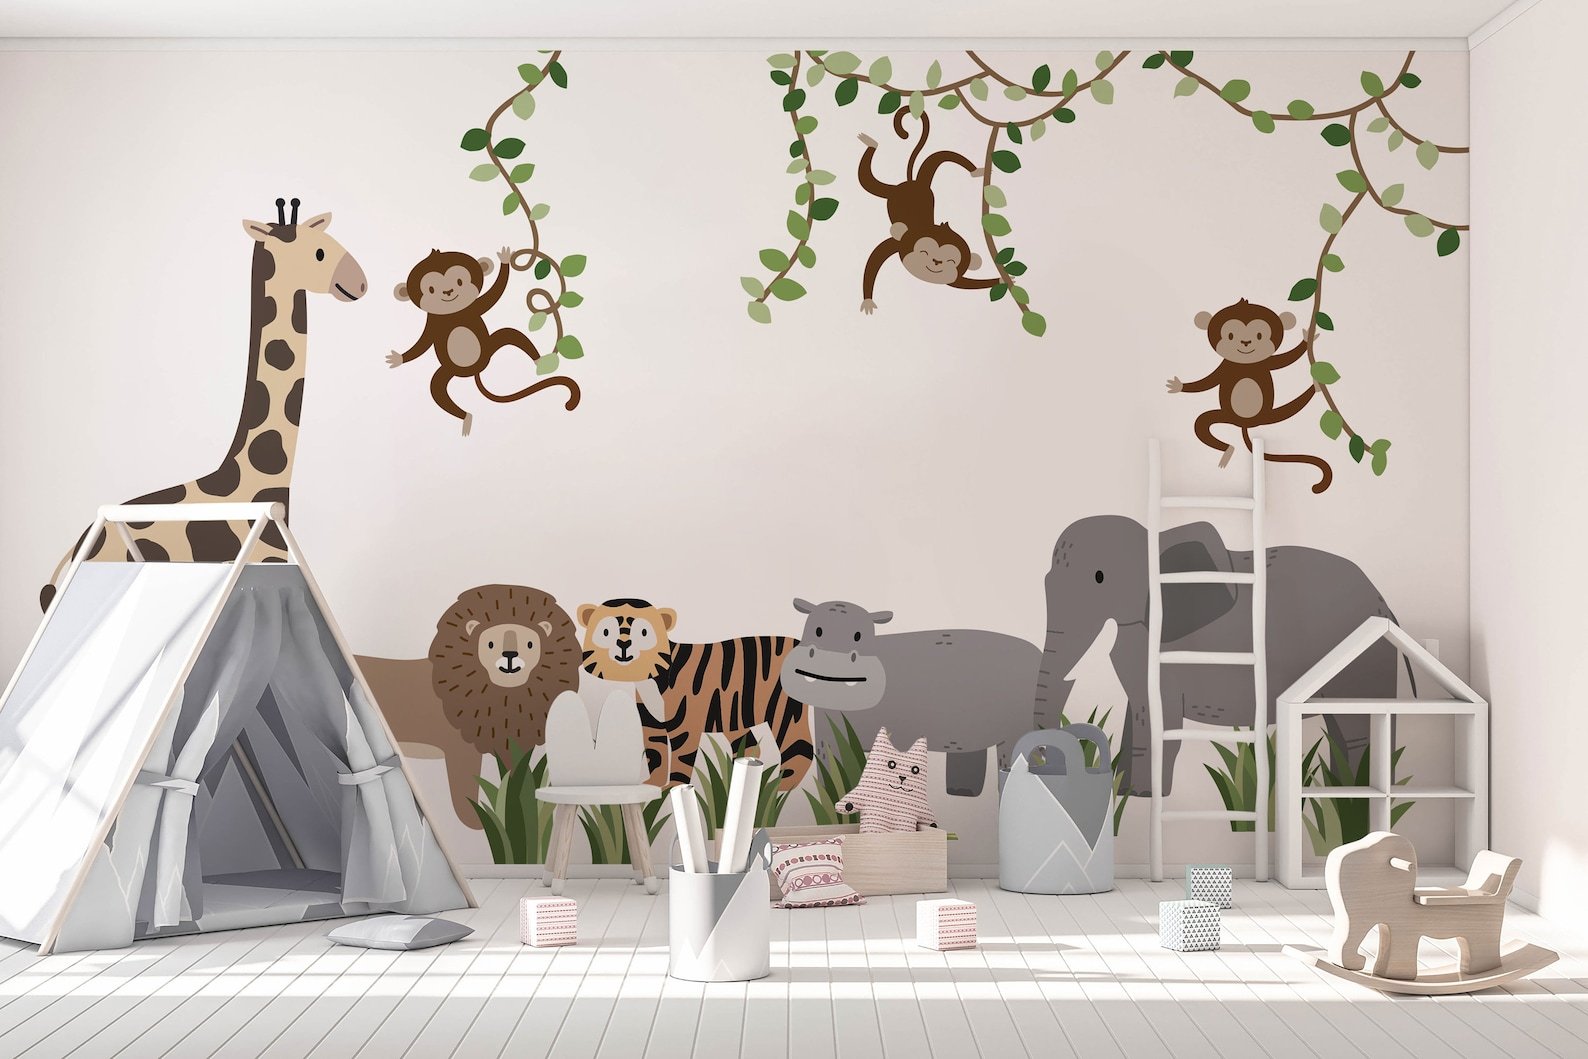
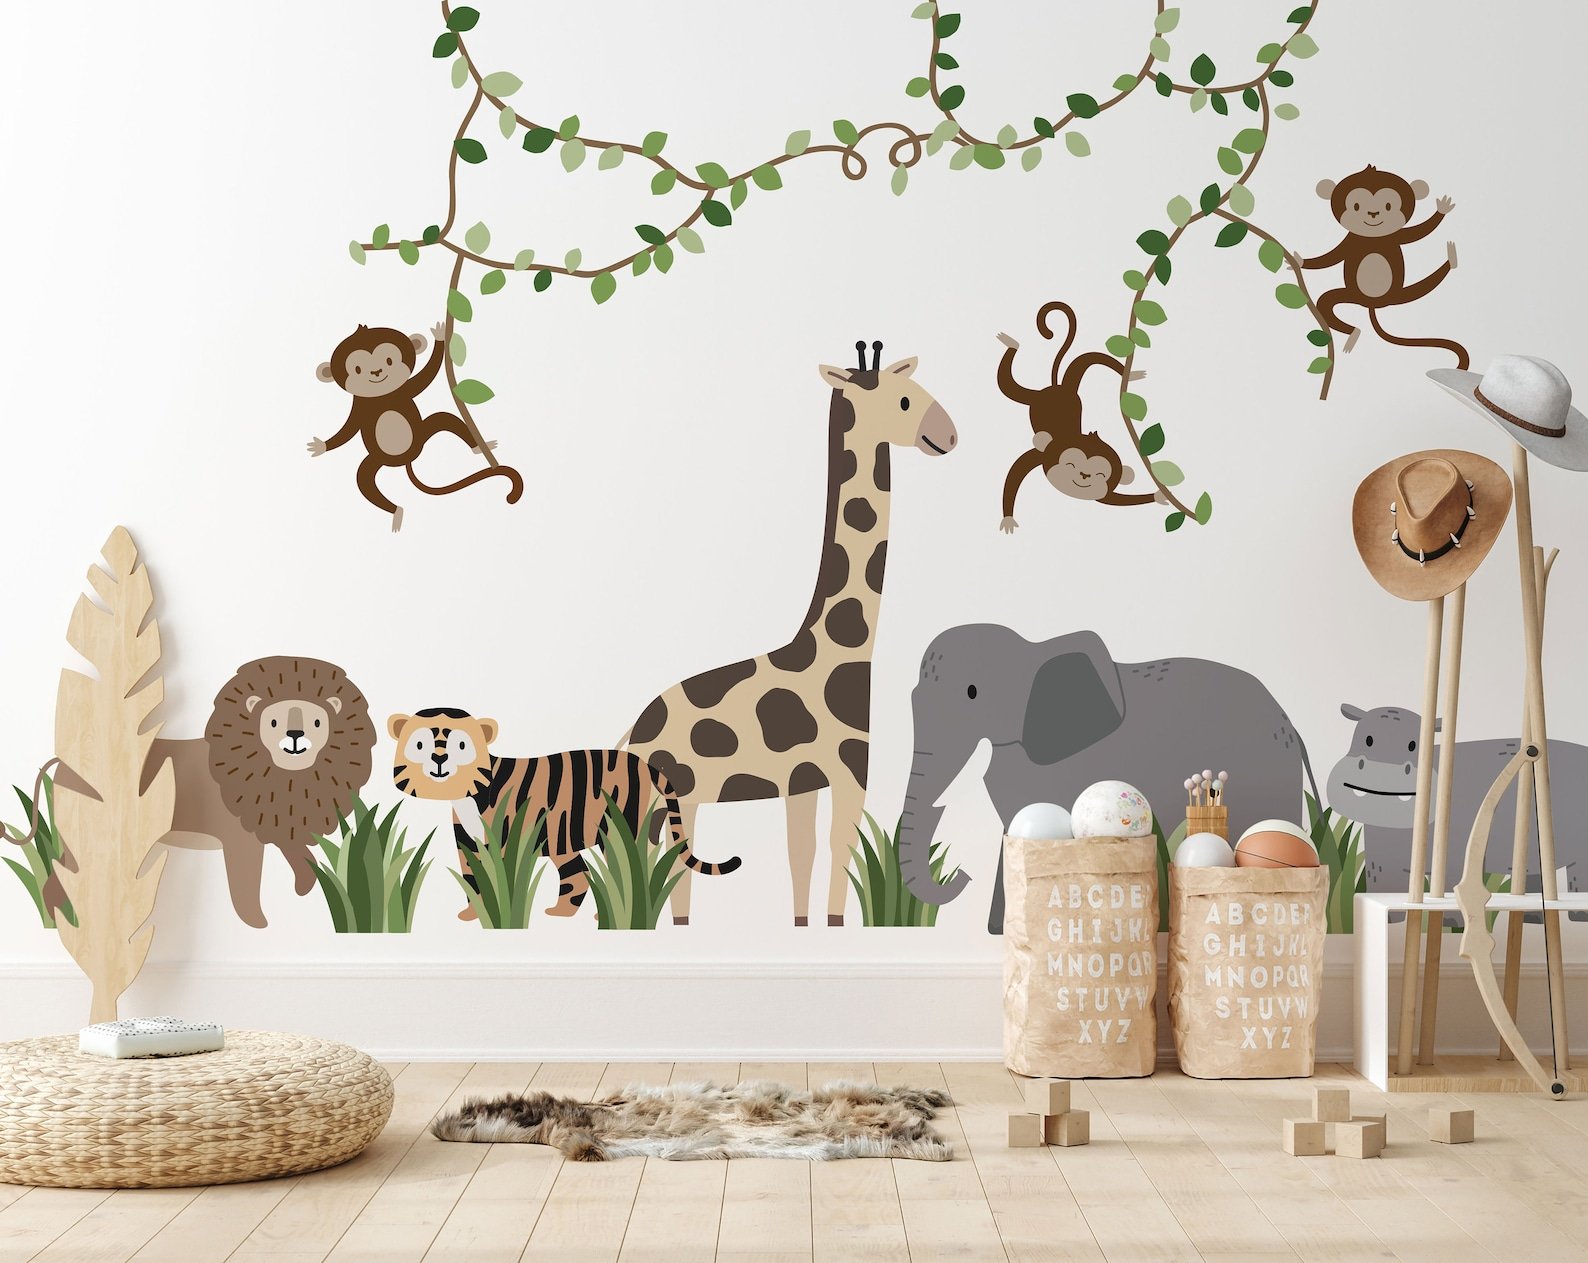
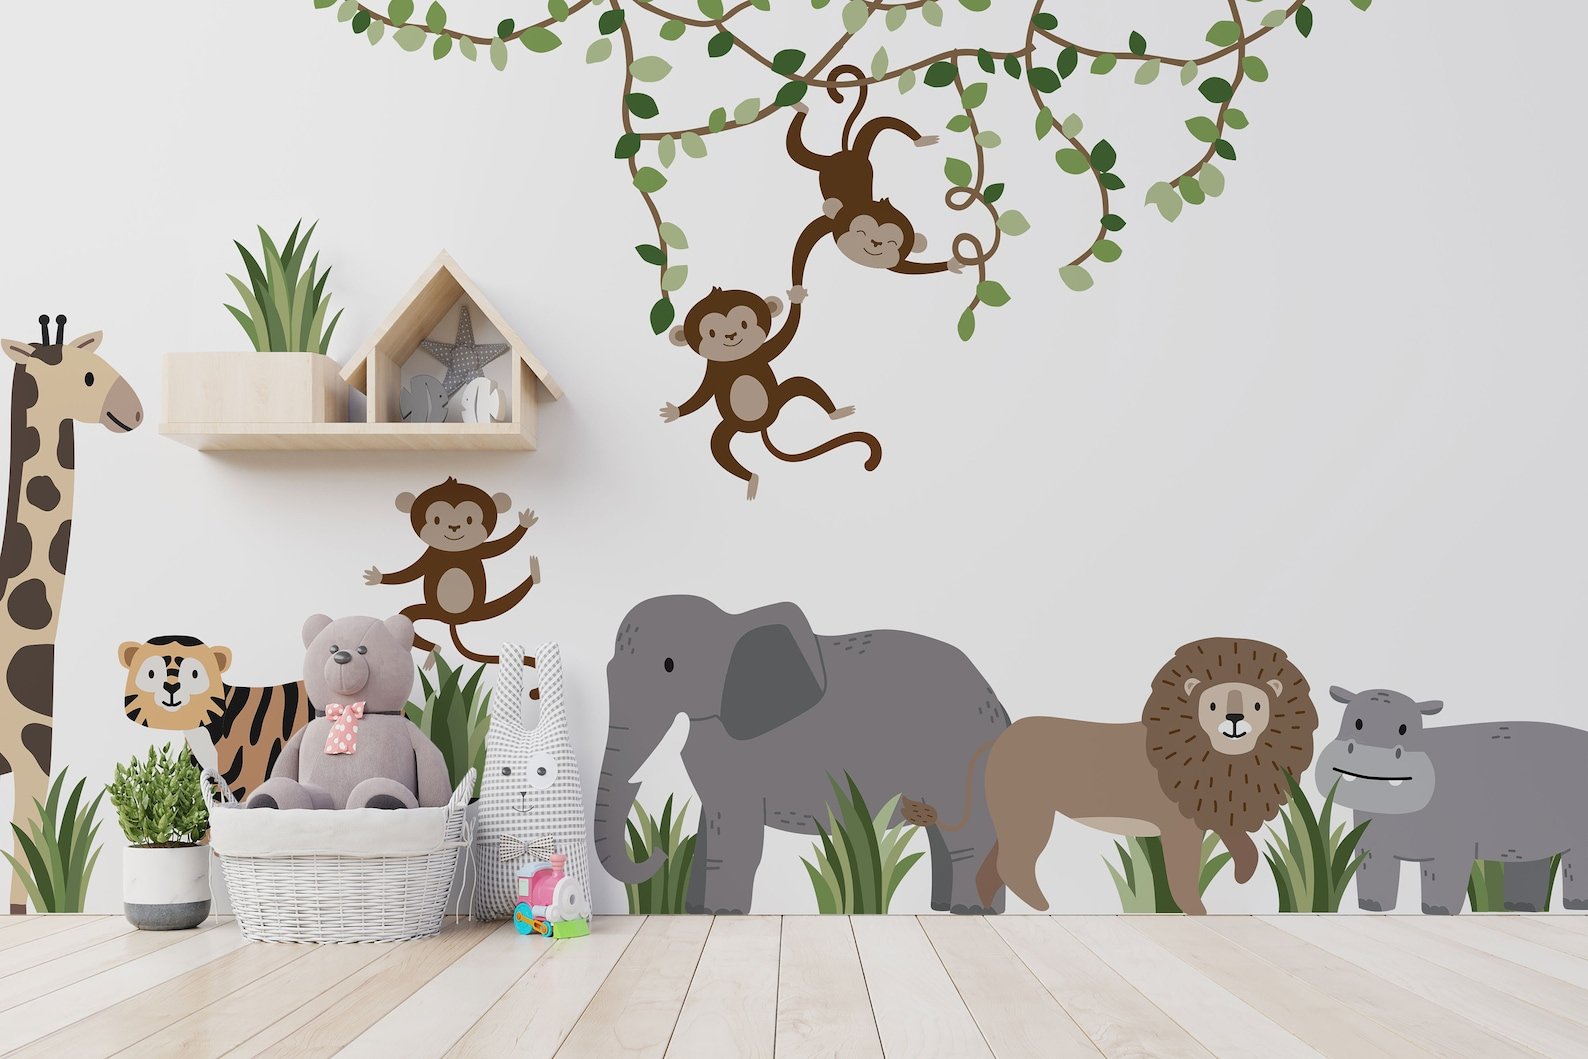
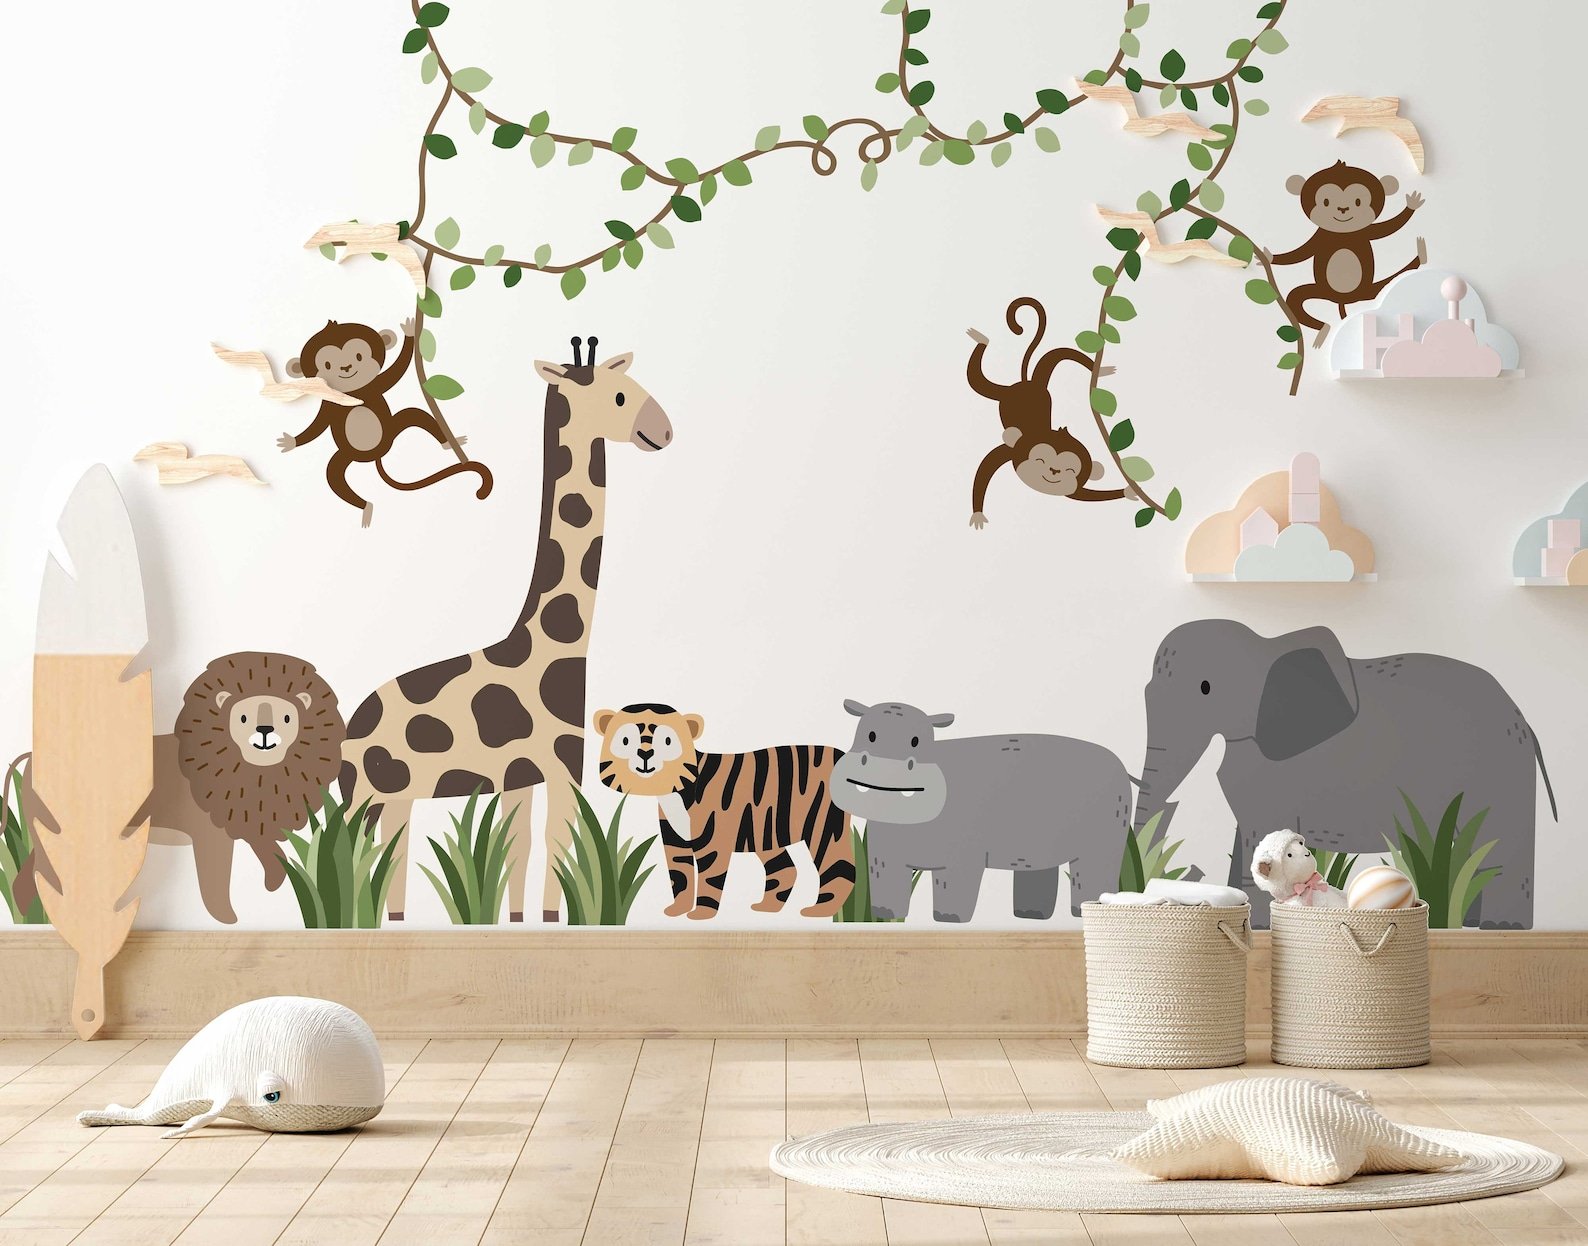
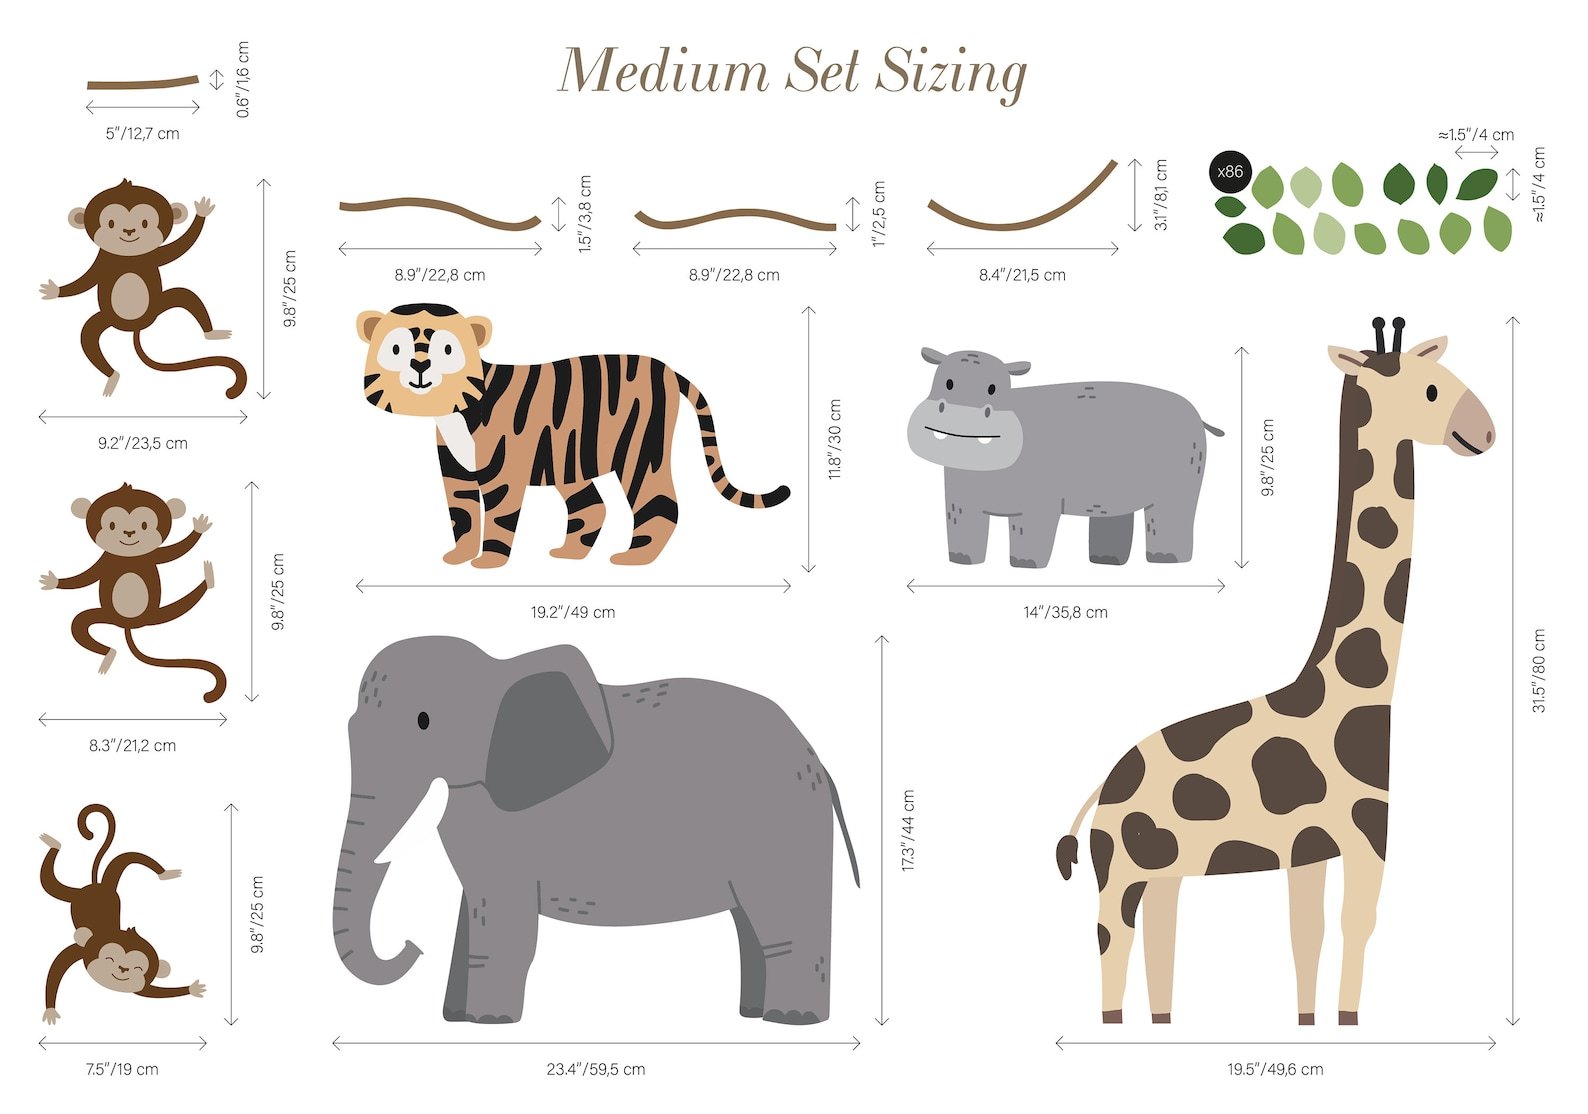
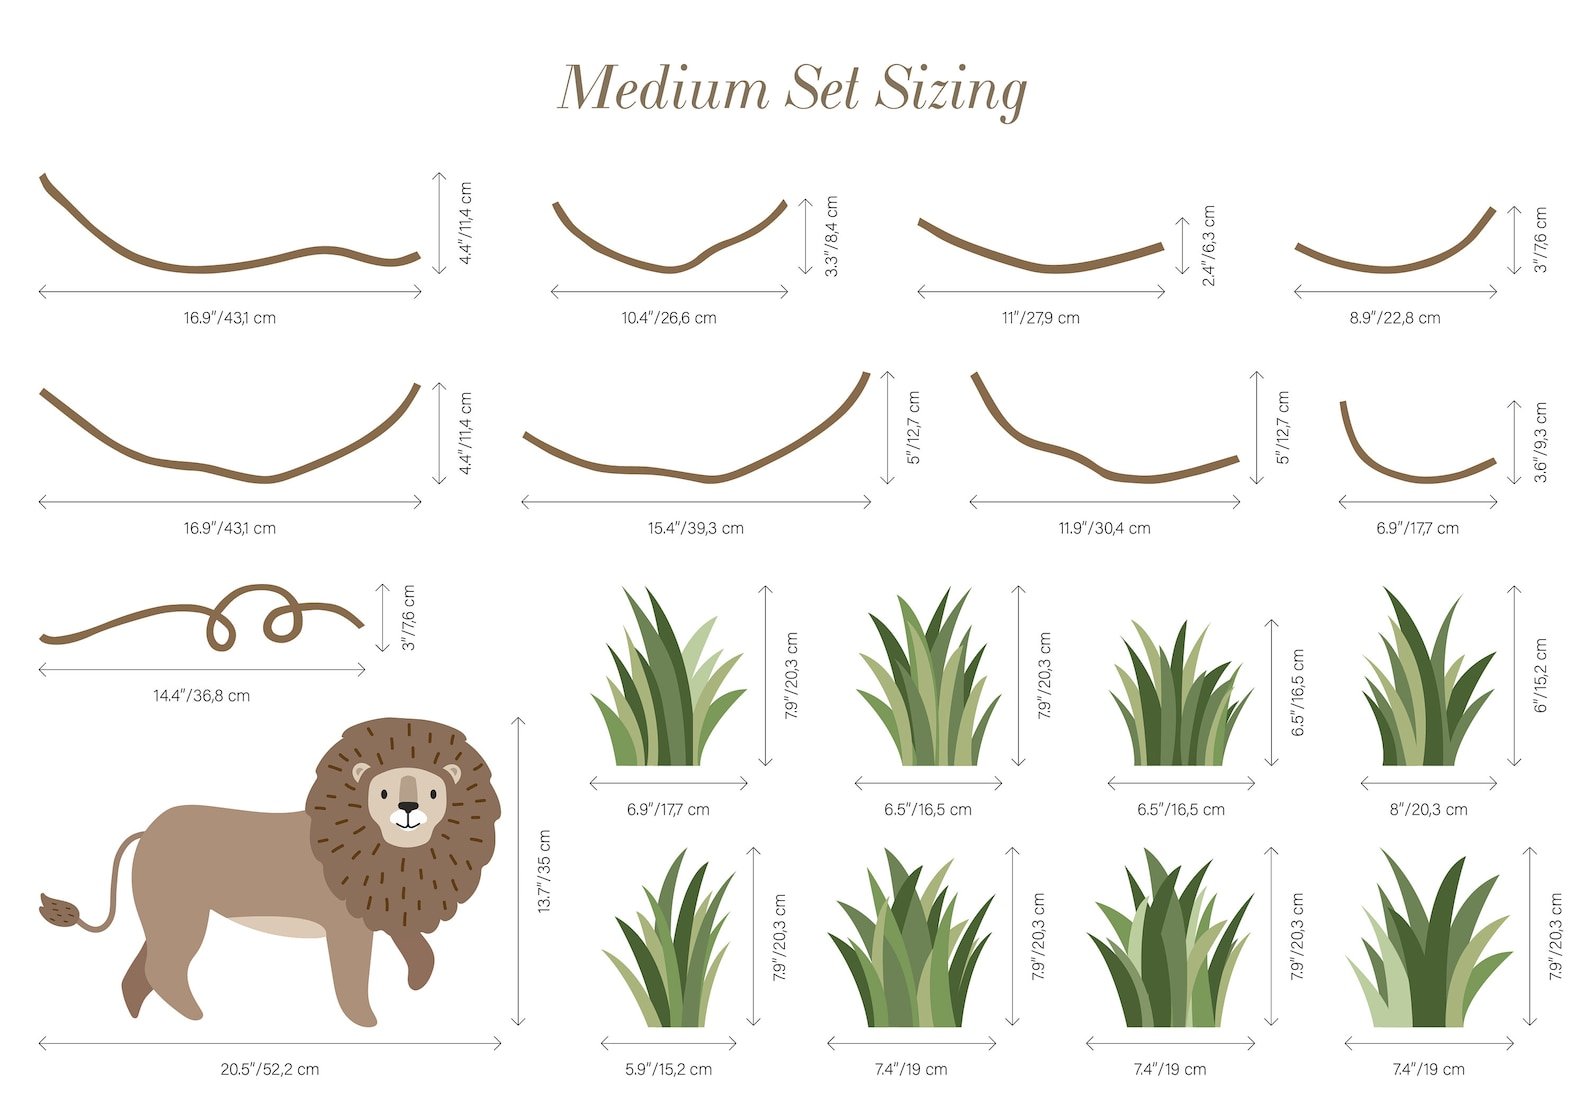

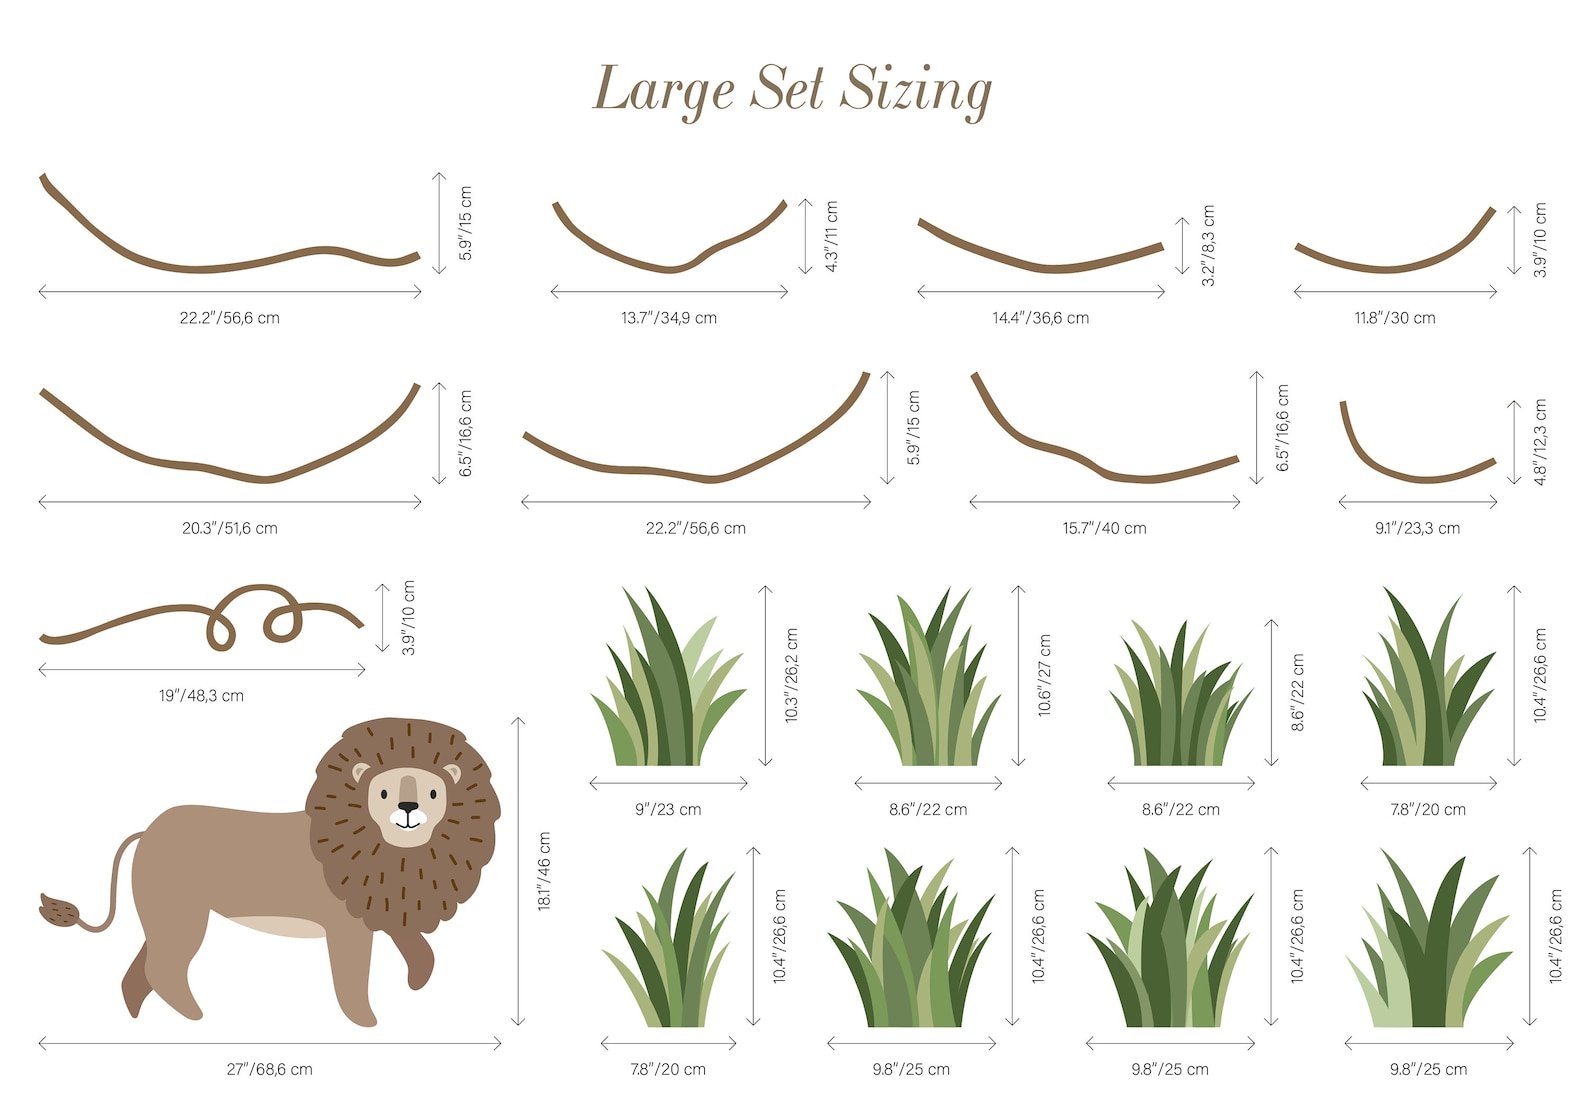
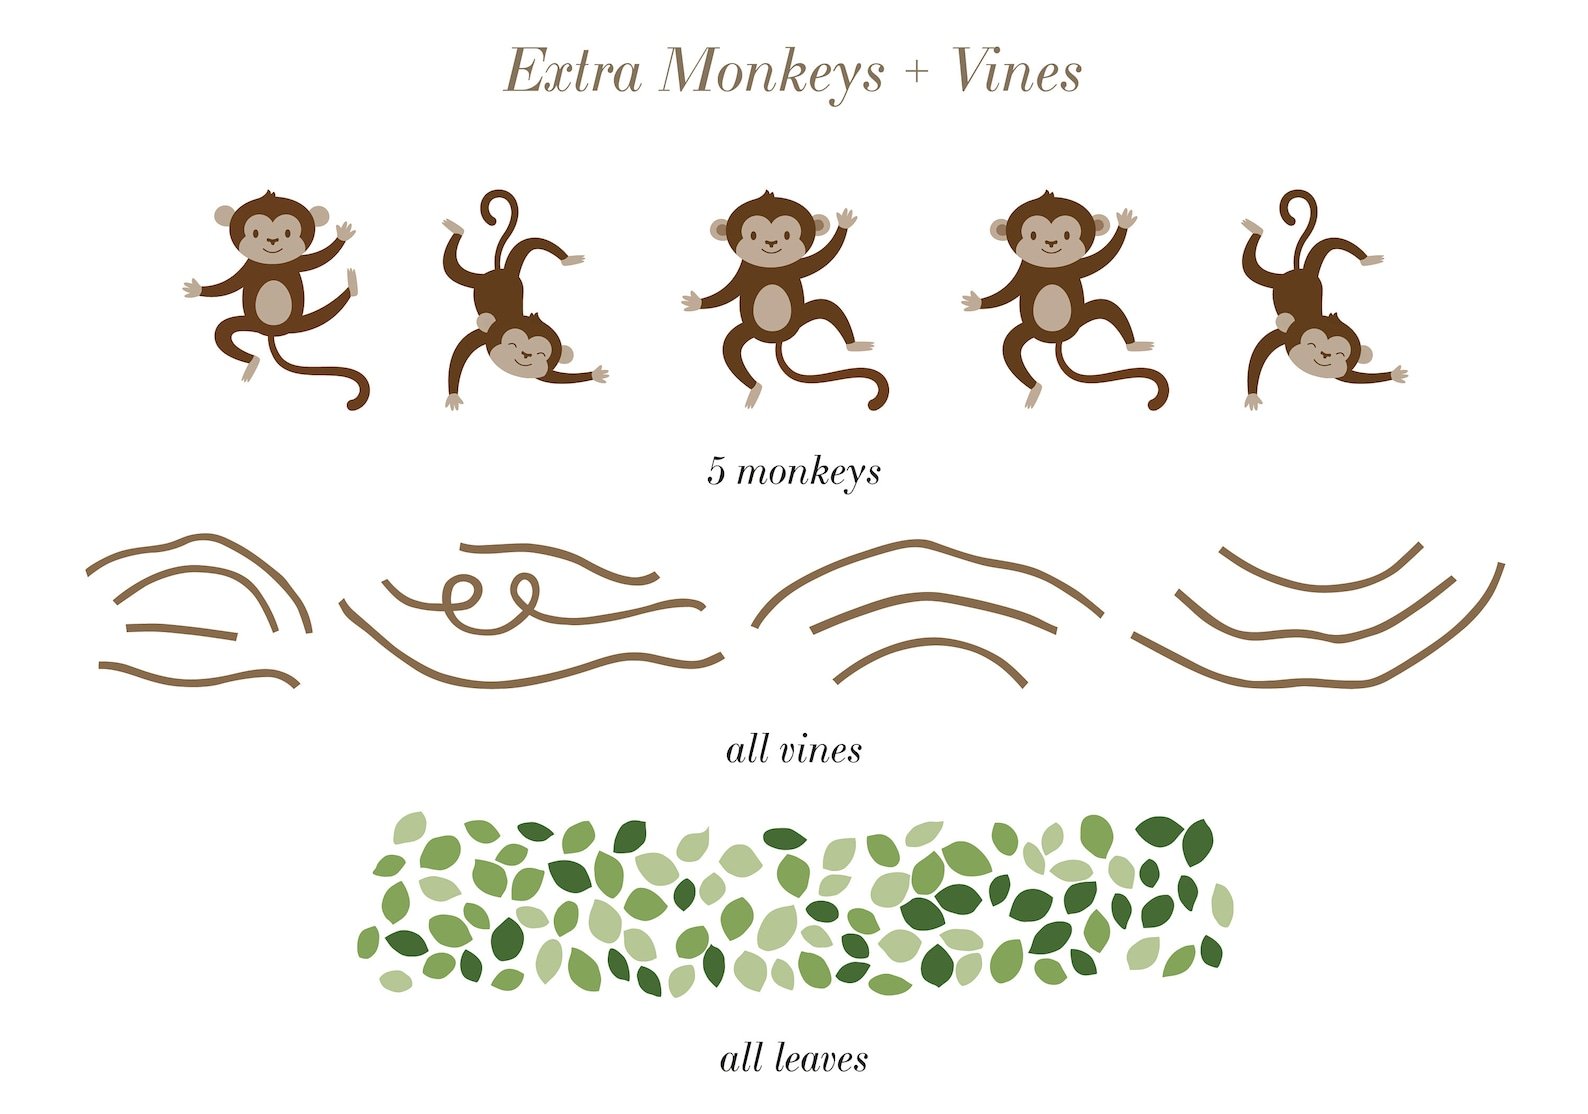
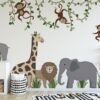
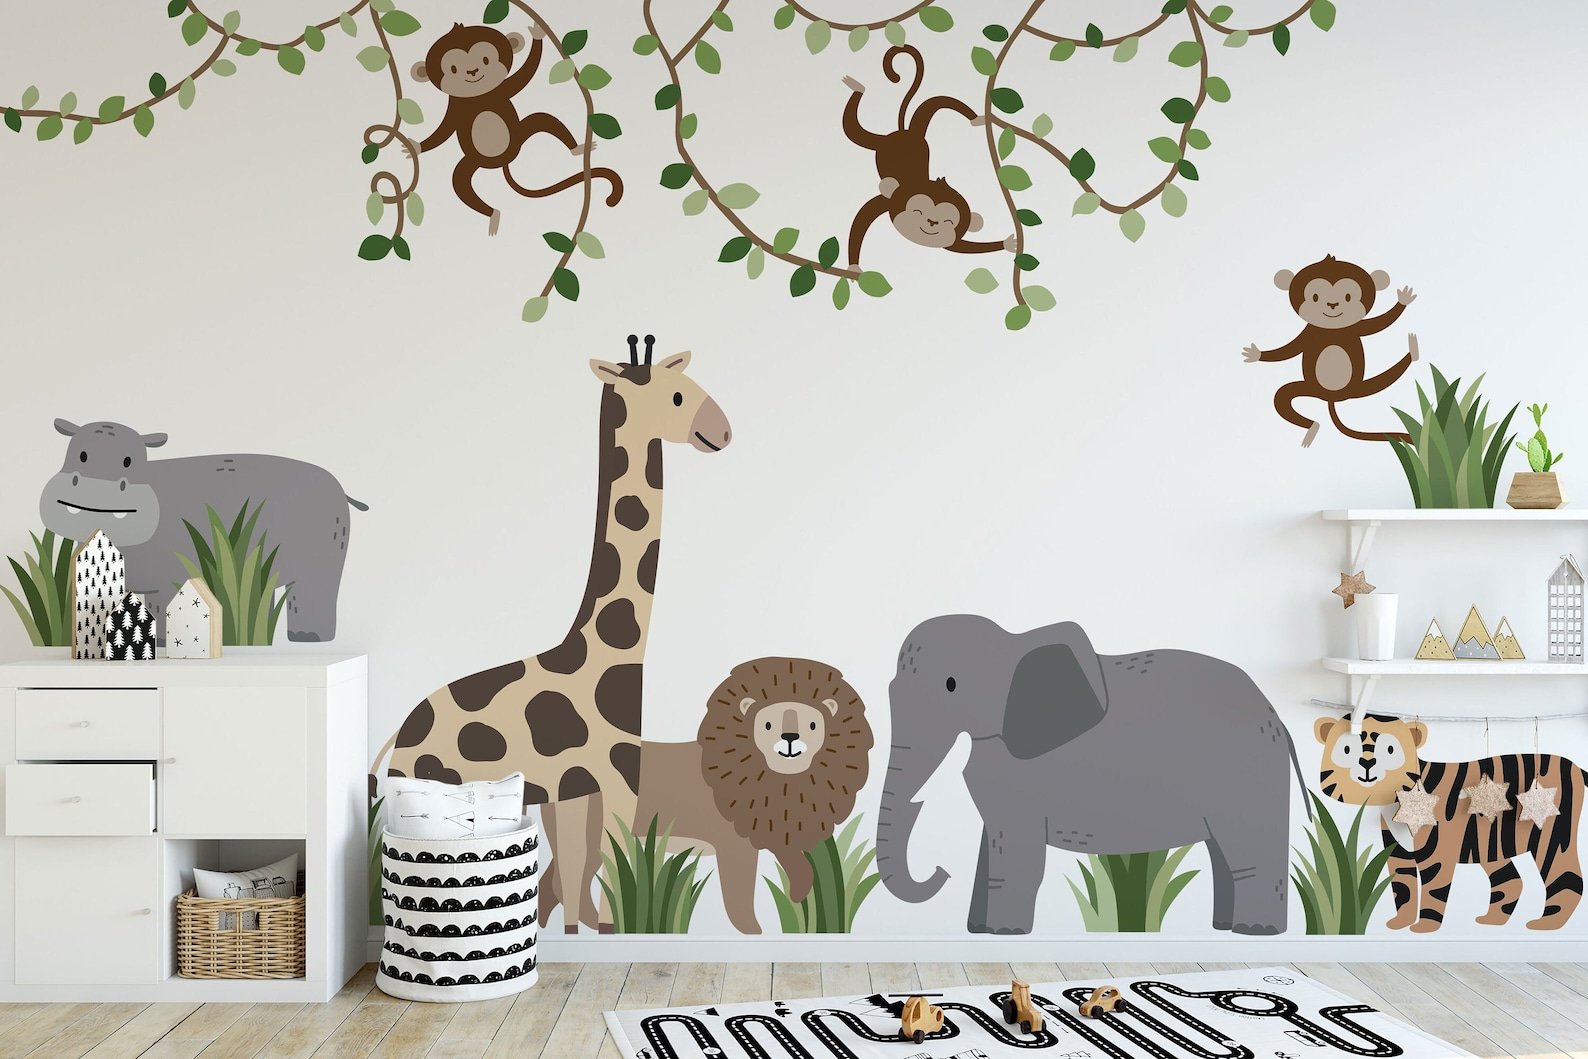
Large Safari Animals and Monkey Wall Decals, Jungle Animal Wall Stickers, Nursery Wall Decals, Repositionable Jungle Wall Decals
From Price range: £15.99 through £64.99
Thank you for choosing our wall decals to enhance your space! To ensure a smooth and successful application, please follow these step-by-step instructions.
Before You Begin:
- Ensure your wall is clean, dry, and smooth. Remove any dust, dirt, or grease spots with a clean, damp cloth and allow the wall to dry completely.
- Gather the necessary tools: a soft cloth or squeegee, a measuring tape, and possibly a level and a pencil.
- Unroll the decals and lay them flat on a clean surface for a few hours to eliminate any curling.
Installation:
1. Plan Your Layout:
- Temporarily tape the decals to the wall with painter’s tape to finalize their placement. Use a level and measuring tape to ensure alignment and spacing according to your design plan.
2. Prepare the Surface:
- Clean the application area again if necessary, ensuring it’s dust and moisture-free.
3. Peel and Stick:
- Carefully peel the decal from the backing paper at a 45-degree angle. If the decal sticks to the backing, slowly replace the paper and try peeling it again, applying pressure to the areas where the adhesive is strongest.
- For larger decals, it may be helpful to have a second person assist by holding the decal away from the wall as you peel the backing.
4. Apply the Decal:
- Starting from one side, use your hand or a squeegee to smooth the decal onto the wall. Move slowly to avoid air bubbles. If bubbles do appear, gently work them towards the edges with the squeegee or a soft cloth.
- For larger decals, consider applying them from the top down, smoothing as you go.
5. Smooth and Secure:
- Once the decal is in place, firmly press over the entire surface with a soft cloth or a squeegee to ensure it’s fully adhered to the wall.
- If any edges lift or bubbles appear, gently press them down or work them out toward the nearest edge.
Aftercare:
- Avoid direct sunlight or extreme temperatures, which can affect the adhesive.
- To clean, lightly dust with a soft, dry cloth. Avoid using chemicals or abrasives.
Removal:
- Gently peel the decal off the wall at a 180-degree angle. If necessary, use a hairdryer on low heat to warm the decal and loosen the adhesive, making it easier to remove without damaging the wall.
Note: The ease of removal and the condition of the underlying wall can vary based on the wall’s finish, the duration the decal has been applied, and environmental factors. Always remove decals slowly and carefully.
Thank you for following these instructions. We hope you enjoy your new wall decal and the transformation it brings to your space! If you have any questions or need further assistance, please don’t hesitate to contact us.
Peel and Stick material is a versatile and user-friendly option for wall decals and wallpaper, designed to make the installation and removal process as easy as possible. This material consists of a fabric or vinyl base with a self-adhesive backing that can be applied directly to walls and other smooth, clean surfaces without the need for additional adhesives or pastes.
Key Features of Peel and Stick Material:
- Self-Adhesive: The backing of Peel and Stick material contains a pressure-sensitive adhesive that securely attaches to surfaces when pressure is applied, making it easy to install by simply peeling the backing off and sticking the material to the wall.
- Removable and Repositionable: One of the most appealing aspects of Peel and Stick material is its ability to be easily removed and repositioned without leaving residue or damaging the underlying surface. This makes it an ideal choice for renters, temporary decorations, or anyone who likes to frequently update their decor.
- Durable and Resilient: Despite its flexibility and ease of use, Peel and Stick material is durable and resistant to tearing. It’s designed to withstand the rigors of everyday life, making it suitable for both residential and commercial applications.
- Printable Surface: The surface of Peel and Stick material is optimized for high-quality digital printing, allowing for vibrant colors and sharp details. This makes it an excellent medium for a wide range of designs, from intricate patterns to bold graphics.
- Easy to Clean: This material is generally easy to clean and maintain, requiring only a soft, damp cloth to wipe away most marks or spills.
- Versatile Applications: While commonly used for wall decals and wallpaper, Peel and Stick material can also be applied to furniture, doors, and other flat surfaces, offering endless possibilities for personalization and decoration.
When using Peel and Stick decals or wallpaper, it’s important to ensure the surface is clean, dry, and smooth for the best results. The material’s flexibility and ease of use make it an attractive option for DIY decorators looking to add a personal touch to their spaces without the commitment of traditional wallpaper.
Preparing the surface properly is crucial for ensuring the best adhesion and appearance of your Peel and Stick decals or wallpaper. Here’s how to prepare the surface before application:
1. Clean the Surface:
- Start by cleaning the wall or surface where the decal or wallpaper will be applied. Use a damp cloth to wipe away any dust, dirt, or grease. For walls, a mild detergent diluted in water can help remove stubborn stains or marks, but make sure to rinse the area with a clean, damp cloth afterward to remove any soap residue.
2. Dry the Surface:
- After cleaning, allow the surface to dry completely. Any moisture remaining on the wall can affect the adhesive’s ability to bond properly.
3. Smooth the Surface:
- Inspect the wall for any holes, cracks, or imperfections. Use spackling paste or wall putty to fill in any small holes or cracks, and sand the area smooth once the filler has dried. For larger imperfections, more extensive repairs may be necessary for a smooth application surface.
4. Remove Loose Paint:
- If the paint on your wall is peeling or flaking, scrape away any loose paint and sand the area smooth. This ensures that the Peel and Stick material adheres to a stable surface.
5. Prime if Necessary:
- If you’re applying the decal or wallpaper to a porous surface (like unsealed wood) or if the wall has been repaired and filled, applying a primer can create a more uniform surface that enhances adhesive performance. Make sure the primer is completely dry before proceeding with the decal or wallpaper application.
6. Remove Wall Fixtures:
- Take down any wall fixtures, outlet covers, switch plates, and hooks. This will allow you to apply the decal or wallpaper without obstructions, ensuring a smooth, continuous surface.
7. Measure and Mark:
- For larger decals or wallpaper applications, use a measuring tape and a level to mark where you’ll be placing the material. Light pencil marks can guide placement and ensure alignment.
Additional Tips:
- Avoid applying Peel and Stick products to freshly painted walls. Wait at least 2-3 weeks after painting to ensure the paint is fully cured.
- Be cautious when applying over textured walls. While some Peel and Stick materials can adhere to lightly textured surfaces, heavy textures may prevent proper adhesion.
- Consider the room’s conditions. High humidity areas like bathrooms may affect the adhesive, so choosing a product designed for such environments is advisable.
By following these steps to prepare your surface, you can create the ideal conditions for your Peel and Stick decals or wallpaper to look beautiful and last longer.
Looking for a custom size? No problem! Contact us with your specific dimensions, and we’ll create a custom order just for you.
You may also like


Print your own
wallpaper
A patterned wall mural for the hallway, textured wallpaper for the living room or a colourful motif for a child’s room – with our wall murals you can change the mood of every room.
Need some
inspiration?
A patterned wall mural for the hallway, textured wallpaper for the living room or a colourful motif for a child’s room – with our wall murals you can change the mood of every room.


Reviews
There are no reviews yet.